The Airway
Introduction
Airway management is crucial within OMFS. You will most commonly see head and neck oncology patients with tracheostomies and also patients who have experienced major trauma that need to have their airway protected. Tracheostomies can be very daunting when you first come across them however it is important to acquaint yourself quickly and be able to perform first line management if an issue arises involving the airway.
Indications
• Undergoing surgery to or around the upper airway
• Unable to maintain an airway independently
• Patient is likely to need prolonged artificial ventilation/assist in weaning
• Obstructed upper airway
Additional to this, we are frequently called to perform surgical tracheostomies for ITU patients when they are unable to perform them percutaneously.
Tracheostomy Tubes
The tubes themselves come in various forms each with different characteristics. For example, fenestrations, inner tube, cuffed or uncuffed, diameter, length and flexibility. The size of the tracheostomy is identified by a number and in adults this is between 6 and 9. As expected, there are specific tracheostomy tubes and kits for paediatric patients.
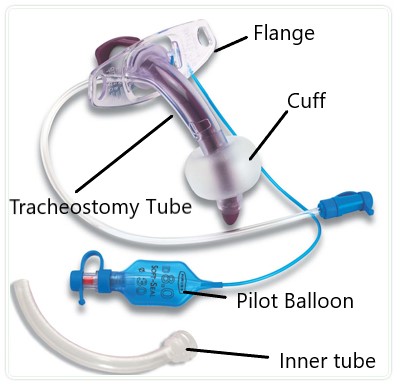 Figure 1. Labelled Tracheostomy tube [1]
Inner Tubes
The inner tube refers to a tube which is slightly smaller than the tracheal tube and this fits securely within it. This can be easily removed and replaced. This is advantageous for several reasons such as allowing us to remove secretions from the airway and reduce obstruction. In the event of an airway obstruction in a patient with a tracheostomy, the inner tube can be removed and cleaned while the tracheal tube remains in place thereby maintaining the airway and allowing you to suction if necessary. If you are unsure on how to do this, please ask a senior for guidance.
Fenestrated vs Non-fenestrated
Fenestrations refers to the presence of holes in the tube. This is useful for the weaning patients from tracheostomies. By using a fenestrated tube, patients are able to vocalise when the opening is occluded however you must be confident that the patient can maintain their upper airway as there is a risk of aspiration and/or obstuction.
Bear in mind, that the tracheal tube can be fenestrated/non-fenestrated as well as the inner tube. Generally, a fenestrated tracheal tube is used with a non-fenestrated inner tube initially and as the patient recovers post-operatively, you transition the patient to a fenestrated inner tube.
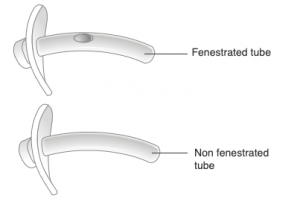 Figure 2. Fenestrated vs Non-fenestrated tube [2]
Cuff
Tracheostomy tubes as seen above have a cuff. The purpose of the cuff is to secure the airway. On insertion, the cuff is deflated however once the surgeon is happy with the position of the tracheostomy tube, the cuff is inflated. The pressure within the cuff is monitored and tested to ensure there are no leaks around it. It is important for the cuff pressure to be checked, usually done by the anaesthetist on insertion as over-inflation can lead to pressure necrosis of the tracheal walls.
Note you can also have tracheostomy tubes with no cuff however you are unlikely to come across this. The cuff is subsequently deflated once we are happy patients can protect their own airway.
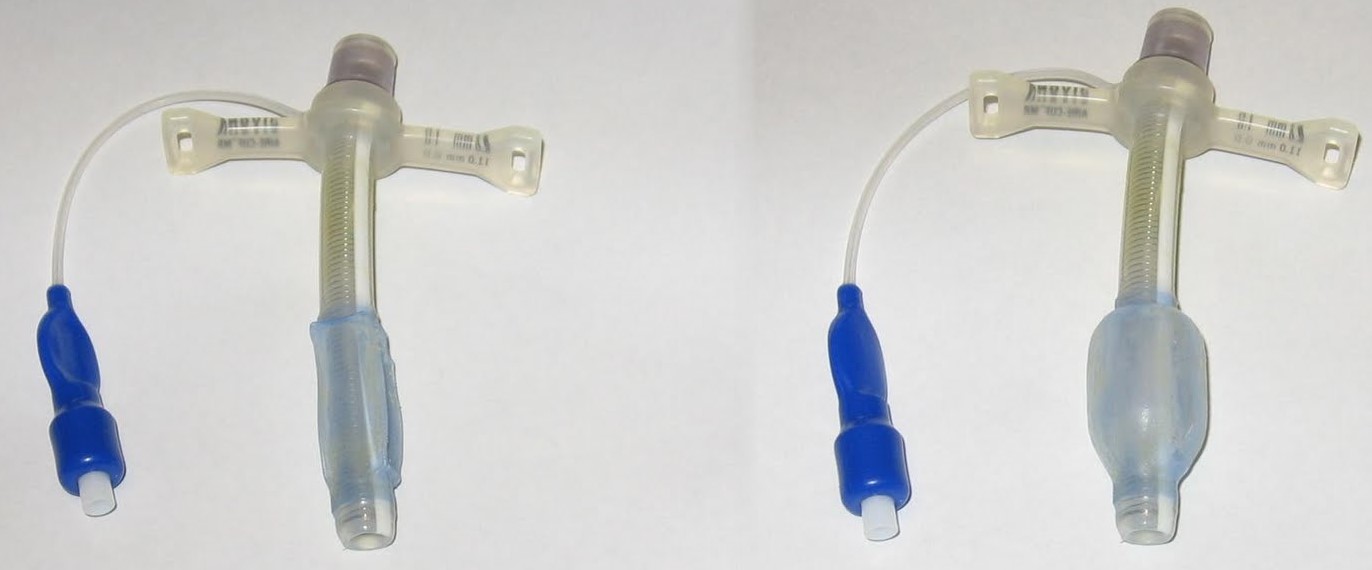 Figure 3. Cuff down (left) vs up (right) [3]
Flange
These can be characterised as adjustable and non-adjustable. The flanges are secured to the skin by sutures in head and neck patients however can be secured by tapes in other circumstances. Adjustable flange tubes have very specific indications:
• Patients with very large neck girth including the obese
• Abnormal anatomy
• Actual or anticipated oedema after surgical procedures
• Patients who have an abnormally large distance from their skin to trachea
The advantage with an adjustable flange is that it allows control of the tube length. However most adjustable flange tracheostomy tubes will not enable the use of an inner tube and you will find most ward patients will not have these tubes.
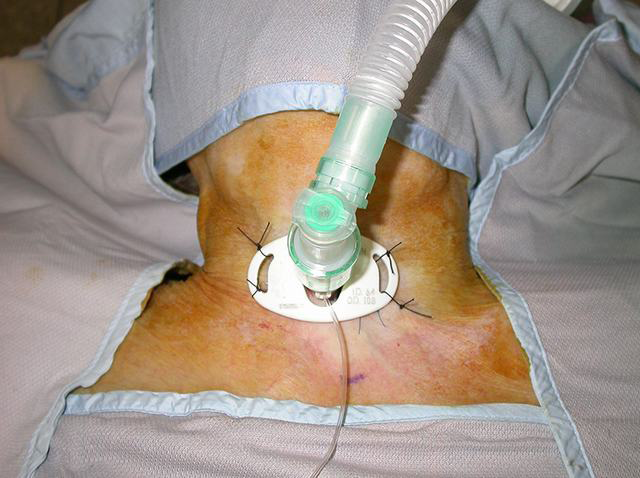 Figure 4. Flange secured to the skin by sutures [4]
Anatomy Overview
During the procedure, the patient will have their neck extended which will make the relevant structures more prominent and provide improved access.
WE aim to create the tracheostomy below the 1st tracheal ring and are aware of the following structures:
• Sternal notch
• Thyroid isthmus
• Cricothyroid membrane
• Cricoid cartilage (cricoid prominence)
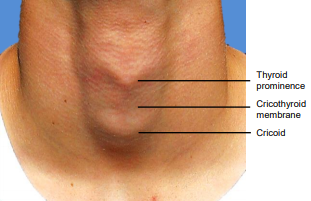 Figure 5. Landmarks for a tracheostomy [5]
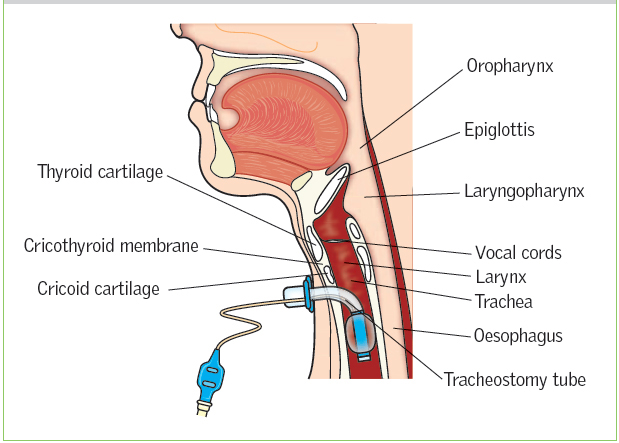 Figure 6. Sagittal view of correct tracheostomy position [6]
Management of Tracheostomy patients on the ward
Humidification
Chest infections can be quite common with head and neck oncology patients as they have tracheostomies and are not mobilising. The tracheostomy bypasses the body’s own humidification system which results in drier secretions which are more difficult for the patient to remove.
Saline nebulisers are commonly prescribed to reduce the viscosity of secretions. However systemic hydration will ultimately help the patient with their secretions as the mucous membranes will not be as dry. Therefore, if you notice patients are becoming “chestier” and are having trouble clearing their secretions, consider prescribing saline nebulisers. (Remember to check your trust protocol in terms of what to prescribe)
Changing/cleaning the inner tube
If after humidification, the general respiratory condition of the patient is not improving, it may be worth inspecting and changing the inner tube. Secretions from the lung can adhere to the lumen of the tube, reducing the diameter and this may be reflected in decreased oxygen saturations. If this is not identified and treated promptly, stasis of the secretions may result in the formation of a mucous plug which may begin to occlude the airway.
A common cleaning solution for inner tubes is sterile saline and they can be cleaned at the bedside.
How to clean/change an inner tube:
1) Sit the patient upright
2) Remove the inner tube and inspect it. If clean, it can be re-inserted. If you are changing the inner tube, simply insert the new inner tube and ensure it is sitting correctly and the patient is comfortable.
3) If the inner tube needs to be cleaned only then a spare tube should be inserted
4) The dirty inner tube can be cleaned with saline and a foam brush or gauze
5) Once visibly clean and dry, it can be replaced
6) Document the procedure in the notes
Note disposable inner tubes are more common these days. [7]
Tracheal Suctioning
Tracheal suctioning should be not carried out routinely and an assessment of the patient should be made beforehand.
Indications for suctioning:
• Visible or audible secretions
• Maintain patency of the artificial airway
• Increased coughing
• Desaturation
• Course/absent breath sounds on auscultation
Always check the size of the suction catheter relative to the tracheal tube, use the smallest diameter catheter necessary.
How to suction a tracheostomy tube:
1) Sit the patient upright
2) Connect the suction catheter to the suction apparatus
3) Ask the patient to take deep breaths
4) Pass the suction catheter into the tracheal tube until you feel resistance or the patient coughs
5) Withdraw the tip applying suction only as you remove it
6) Repeat steps 3 to 5 until the secretions are cleared. Remove the inner tube if necessary
7) Document the procedure in the notes [8]
Decannulation
Decannulation refers to removal of the tracheostomy tube. For our head and neck patients this isusually done after a series of stages such as changing to a fenestrated tube, trialling capping of the tracheostomy tube, capping the tube for an extended period of time and when the surgeons are confident the patient can maintain their upper airway, the tracheostomy tube is removed. The patient should be decannulated early in the day (9am-3pm) so any emergency issues are likely to occur during the day. Decannulation is usually done by the stoma nurses or senior members of staff.
How to decannulate:
1) Ensure the patient is comfortable and explain the procedure.
2) Attach a pulse oximeter
3) Check the cuff is deflated
4) Remove any sutures whilst manually holding the tube in the tracheostomy to ensure it doesn't fall out
5) Ask the patient to breathe normally and withdraw the tube
6) Clean stoma site and apply a dressing to occlude the stoma
7) Check the patient’s observations
8) Encourage the patient to press on the dressing to allow them to talk and/or cough
9) Document the procedure in the patient’s notes [8]
Emergency Care
The red flags for tracheostomy emergencies can be categorised as follows:
Airway
If the patient has a cuffed tracheostomy, they should not be able to speak to you. Similarly grunting, snoring or stridor are clear indicators of an airway issue.
Breathing
• Is the patient breathing?
• Is the patient experiencing difficulty breathing? (accessory muscle use, respiratory rate, higher airway pressures, lower tidal volume)
• Hypoxia (low sats)
• Noisy breathing
Specific tracheostomy signs
• Displaced tracheostomy tube
• Blood/blood-stained secretions
• Pain
• Repeated deflation of the cuff
General
Changes in:
• Respiratory rate
• Heart rate
• Blood pressure
• Level of consciousness
References
[1] Tracheostomy tubes - St George's University Hospitals NHS Foundation Trust [Internet]. St George's University Hospitals NHS Foundation Trust. Available from: https://www.stgeorges.nhs.uk/gps-and-clinicians/clinical-resources/tracheostomy-guidelines/tracheostomy-tubes/
[2] Tracheostomy Tubes | Tracheostomy Education [Internet]. Tracheostomy Education. Available from: https://tracheostomyeducation.com/tracheostomy-tubes/
[3] Image from: Power D, Power D, profile V. Birthday Balloons [Internet]. Dcpower01.blogspot.com. Available from: http://dcpower01.blogspot.com/2011/08/birthday-balloons.html
[4] Muscat K, Bille A, Simo R. A guide to open surgical tracheostomy. Shanghai Chest. 2017;1:4-4.
[5] Open Access Atlas of Otolaryngology, Head & Neck Operative Surgery | Developing World ENT [Internet]. Entdev.uct.ac.za. Available from: http://www.entdev.uct.ac.za/guides/open-access-atlas-of-otolaryngology-head-neck-operative-surgery/
[6] Myatt R. Nursing care of patients with a temporary tracheostomy. Nursing Standard. 2015;29(26):42-49.
[7] Tracheostomy [Internet]. Tracheostomy.org.uk. Available from: http://www.tracheostomy.org.uk/healthcare-staff/basic-care/inner-cannula-care
[8] Management of patients with tracheostomy tubes. Critical Care Key Documents, WAHT-KD-022. Worcestershire Acute Hospitals; 2019.
[9] Tracheostomy [Internet]. Tracheostomy.org.uk. Available from: http://www.tracheostomy.org.uk/healthcare-staff/emergency-care/emergency-algorithm-tracheostomy
[10] Tracheostomy [Internet]. Tracheostomy.org.uk. Available from: http://www.tracheostomy.org.uk/healthcare-staff/emergency-care/emergency-tracheostomy-laryngectomy